Monthly Archives: September 2021

File, Act, Toss

One of the few staff development seminars I recall was F.A.T, or file, act, toss. The idea was to clear your overflowing desk by going through all the paperwork on it and decide whether to keep it (file,) respond to it (act,) or throw it out (toss.) I used the process with my pile of surface design experiments when said pile fell to the closet floor. The pile is now smaller and neater.

Once I threw out experiments that were beyond help – too overworked, just not appealing, etc. – I chose two to act on. The first is a painting experiment with an empty toilet paper roll cut to flare out. You dip the flared out end in paint and dab it onto fabric. I used it for free motion practice, and gingered up the color with oil pastels. It may become a pillow cover.

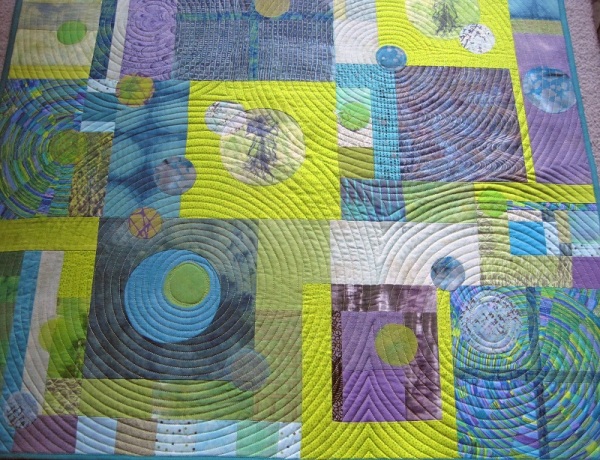
Next, I finished quilting an ancient sampler from about 2005. It was made from scraps left from an Amish type wall hanging, and I had hand quilted about half of it. Knowing I would never finish the hand quilting, I completed it with machine quilting and bound it.

With some actions under my belt, next I turned to the file pile. I tend to have groups of experiments in similar colors or themes as they were done in one session. Here are a few of those groups.

Finally, I decided to keep pieces of dropcloths that could make good backgrounds and a screened linen piece that I just don’t know what to do with.

Both are old cotton sheets that have a lovely hand.
This suffers from fold lines that took the spray paint differently.

I didn’t photograph my discards, though some of you may think I still have plenty to toss. I have lots more in my pile, but those bits are cut into squares in anticipation of a future project.

Are you a hoarder of such experiments or are you more ruthless than I am?

I am linking to Off The Wall Friday.

6 Comments

Filed under Fabric Printing, In Process, Techniques

Spiraling In Control

After a review of videos on machine quilting spirals I sat down with my walking foot and quilted circles all over S.O.S. Doing the inner circles was easier than the videos led me to believe. The hardest part was filling in the gaps between spirals.

S.O.S. 32″ high by 35.5″ wide

I used variegated and rayon thread for quilting, and relied on the edge of my walking foot for most of the spacing. The rest was done by eye, as sometimes little cheats are needed to even things out. I used the appliqued circles as the center of all but one of the four spirals.

Because I have little yardage left in my stash, most of my backs use pieced bits of whatever will fit. S.O.S. is no exception. The batting is Quilters Dream poly. I used 505 temporary adhesive spray to hold the front to the batting. Since the poly batting clings to cotton, I simply ironed the back to the batting. In between quilting the circles I ironed the sandwich to make sure all the layers were still in contact with each other. They got smooshed and a bit separated as I turned everything through my machine’s harp to make the spirals. That tip comes from Jacquie Gering.

I’ve owned both pieces of fabric since around 2010, so I thought it was time to use them up.

Binding is single fold, stitched to the back and folded to the front, with zigzag stitching to hold it down. I decided I don’t like it sewn on the front, so next time I’ll stitch it to the front and then hold down the back with ditch stitching on the front.

I have just one more top awaiting quilting, so I have given myself permission to create more tops. First, though, I’ll do a monoprint course and play around with wonky free motion quilting a la Paula Kovarik. But you know what they say about the best laid plans.

I am linking to Off The Wall Friday.

6 Comments

Filed under Art quilts, Completed Projects

Blue Plate Special

Do you have old pressed glass pieces hanging around your abode? I inherited plates, bowls, small pitchers, and cups done up in pressed glass that were meant to pass for crystal or cut glass. Because it was machine molded it was much more affordable than crystal, which explains why my family, with modest means but a desire to emulate the more well to do, owned pressed glass. I use my inherited pieces on occasion, but didn’t think much about them until I discovered margarts.com.

Actually, I discovered her videos on Instagram which show her printing a wide variety of fruits, veggies, scissors, and pressed glass onto fabric with printing ink. The technique is like the old potato printing you may have done in school, but done more imaginatively. I was eager to try artichoke printing, but I had pressed glass, printing ink, and fabric on hand, so off I went.

First, here are a few of Margaret’s efforts with pressed glass. She makes up her prints into pouches and needle cases.

Then, here are my initial efforts. You can see I’m still working on the correct amount of ink.

It turns out I used that pressed glass pattern some years ago.

The center of “All Decked Out” is a bowl rubbing with a blue (do you see a theme?) paintstik

Since I had my table set up for printing I dusted off my Gelli plate and printed weed leaves and stencils on old napkins used as mop cloths and silk scraps. For these I used Jacquard textile paints.

My final experiments were on crinoline that I had stitched pleats into and painted. For some reason my textile paint was quite watery and so it didn’t stick evenly to the plate when I rolled it out.

I like the watery effect. I’m sure someone sells a stencil just like this.

Maybe I’ll cut up the plate prints into quarters and do a drunkards path type pattern. For now they sit on the top of my pile of experiments.

I’m linking to Off The Wall Friday.

9 Comments

Filed under Fabric Printing, Techniques

In The Ruins

Infrastructure has been in the news lately, with the ongoing federal efforts to fund overdue repairs. I certainly want safe roads, dams, bridges, etc., but I confess to a tendency toward ruin porn. I find a strange beauty in dilapidated, rusted structures. I even enjoy an Instagram account that features photos of peeling, beaten up, scrawled over walls (@revenantreclaimer.)

This attraction is manifest in several of my works, including “Urban Decay.” I wrote about the piece earlier, but I’ve now finished it. Because the matte medium I used further stiffens the already painted fabric, I didn’t use batting but sewed the pieces directly onto the fabric backing. I also added tangles of thread ends and ribbon.

“Urban Decay” after stitching
“Urban Decay” detail of thread tangle
“Urban Decay” detail of ribbon and stitching

The fabric layers give additional texture, not unlike the buildup of paint layers on a wall. The different thicknesses of the fabrics I used (denim, damask, cotton, netting, hopsacking, interfacing) also contribute to the bumpy look. The edges are finished with yarn, and the back is covered with black felt.

Here are a few other works in my ruin porn series.

“Mean Streets”
“Rust Never Sleeps”
“Beneath The Overpass”

I’m linking to Off The Wall Friday.

9 Comments

Filed under Art quilts, collage